

I. The Ladder + BASIC Programming Language
Most PLCs in the industry are programmed by a highly specialized, well-established programming language called "Ladder Logic". Ladder Logic language has its strength in handling single bit digital I/O programming, but it is awkward to handle data processing where numerical data needs to be manipulated.
On the other hand, desktop computers are typically programmed by high-level languages such as BASIC, C, PASCAL, C++, Java etc. These powerful programming languages are designed for data processing, but they are not oriented towards flipping single bit digital I/Os.
By combining these two most important branches of programming languages into one single, seamless entity, we had invented the industry first "Ladder + BASIC" language that can easily handle sophisticated tasks with just a few lines of codes. We have also developed a family of M-series Super PLCs that are exclusively programmed in Ladder + BASIC language, using our highly acclaimed TRiLOGI PLC programming Editor, Compiler and Simulator software.
II. Examples:
Example 1 |
|
1) Create a ladder logic circuit, with an input contact named "Greetings", and use it to trigger a custom function #10 when the button connected to this input is pressed.
Note: Circuit #1 shown below is a standard ladder "seal" circuit which turns on the output "Run" whenever the input "Start" is closed momentarily. The "Run" output will only be turned OFF when the NC "Stop" input is energized. In Circuit #2, both the "Run" bit and "Greetings" input must be closed to trigger the Custom Function #10. The Custom Function #10 is "differentiated" (aka "one-shot") type which means that it will execute only once when triggered
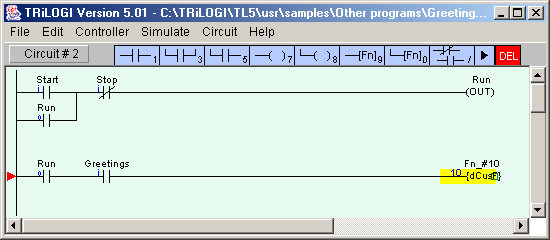
2) Next, edit the custom function #10 and enter the following TBASIC program code:
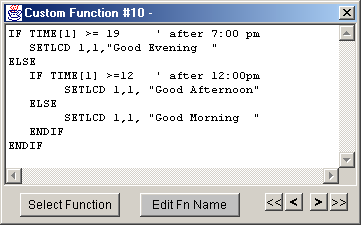
That's all !
Note: You only need to use the BASIC language as and when needed as demonstrated in the above case. Otherwise, the PLC will happily execute standard ladder logic circuit based on AND, OR, NOT, timers, counters only!
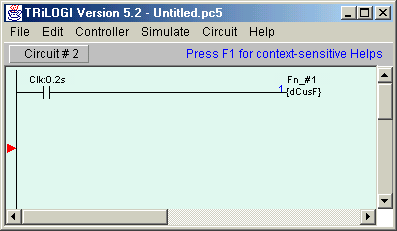
Create your own Digital Tachometer: Monitor the frequency of incoming pulses and display the reading on an LCD display |
This is unbelievably easy to achieve with Ladder+BASIC language! As you can see below , the whole program comprises just one ladder logic rung and one custom function:
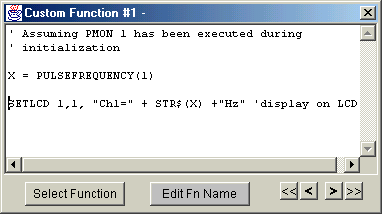
The ladder rung uses a built-in "clock pulse" to trigger the function #1 every 0.2s. The content of Fn_#1 is displayed to the right.
The moment a pulse frequency measurement channel is enabled by the "PMON" command, you can use the built-in "PULSEFREQUENCY(1)" command to obtain the frequency value in Hz. The "SETLCD" command is used to display the data and text on the LCD.
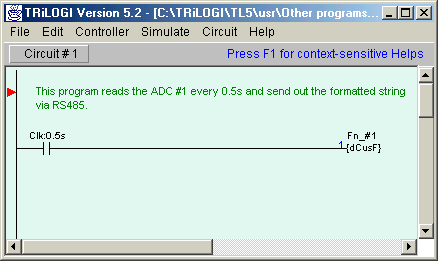
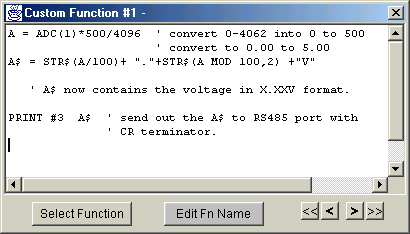
Example 3 |
|
This is also very easily accomplished with Ladder+BASIC. Custom Function Fn_#1 uses built-in ADC(1) command to read ADC signal, which returns a value between 0 - 4096. It then performs math and string operations to convert the reading into ASCII string that can range from "0.00V" to "5.00V". The PRINT #3 function is then used to send the ASCII string out of its RS485 port (comm port #3).
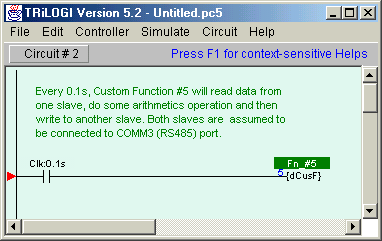
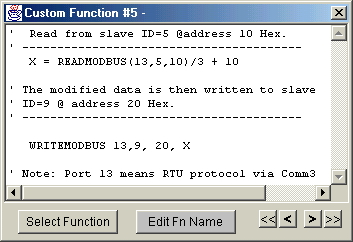
Example 4 |
|
The Super PLC can be a MODBUS RTU master for as many as 247 RTU slaves. The built-in READMODBUS and WRITEMODBUS commands make it extremely simple to READ data from or WRITE data to slave devices, as follow:
Others |
|
| 1. Show Message on built-in LCD | 2. Read Analog Input |
| SETLCD row, column, string
e.g. |
x = ADC(n)
n = 1 to 4 (the analog input channel #) |
| 3. Set Analog Output | 4. Set PWM Output |
| SETDAC n, x n = 1 (D/A #1) x = output value 0 to 4096 e.g. SETDAC 1, (X+Y)/100 |
SETPWM n, x, freq n = 1 or 2 (PWM Channel #) x = output value 0-10000 (0-100%) freq = frequency in Hz e.g. SETPWM 1, 2550, 10000 |
| 5. Run Stepper Motor | 6. Read Real Time Clock |
| STEPSPEED n, pps, acc n = 1 or 2 (Stepper controller channel) pps = Maximum pulses per second acc = acceleration steps to reach max pps. STEPMOVE n, count, rly e.g. STEPSPEED 1, 5000, 100 |
The PLC's Real-Time-Clock (RTC) derived date and time can be accessed via variables DATE[1] to DATE[3] and TIME[1] to TIME[3], respectively.
e.g. IF DATE[4] > 5 THEN … :ENDIF |
Still not convinced of the power and ease of Ladder+BASIC? Then download our TRiLOGI software with built-in simulator, create the above program and run it on your PC to verify the outcome. This software is used by thousands of college students for learning PLC programming. Almost everything can be simulated, including the LCD display and the real time clock.