1. Overview
i-TRiLOGI Version 6.xx supports user-created special functions, known as Custom Functions (the symbol CusFn will be used throughout this manual to mean Custom Functions). Up to 256 CusFns can be programmed using a special language: TBASIC.
TBASIC is derived from the popular BASIC computer language widely used by microcomputer programmers. Some enhancements as well as simplifications have been made to the language to make it more suitable for use in PLC applications.
There are three simple ways to create a new CusFn:
From the "Edit" pull-down menu, select the item "Edit Custom Function" and select the function number from a pop-up CusFn selection table which may range from 1 to 256. The selection table allows you to define unique and easily identifiable names for each custom function. Once you have selected the custom function the editor window will open up with the contents of that particular custom function.
You may also use the hotkey <F7> to open up the selection table.
The custom function editor window allows creation of any number of lines of TBASIC program statements. Since this is a standard text editor, you should have no problem using the key and mouse controls to edit the text. E.g. To copy a paragraph of text, select it using the mouse and the press <Ctrl-C>. Alternatively, you can use <Ctrl-X>, which will cut the text (copy and delete). Once you have copied or cut the desired text, move the text editing cursor to the destination and press <Ctrl-V> to paste it to the new location.
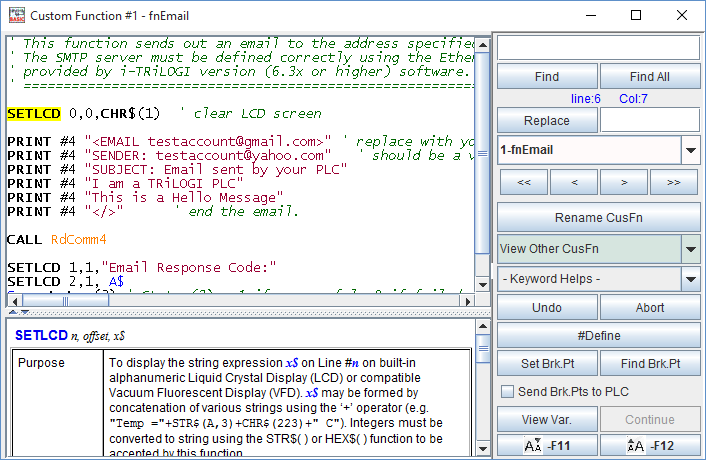
i-TRiLOGI 6.2 and up introduces a brand new custom function editor. The custom function editor now has a whole new interface with split panes that provide text editing for writing code (just like before) on the upper pane and a web browser/TBASIC help information on the lower pane. The first time the custom function editor is opened after starting i-TRiLOGI, the text editor pane will be empty and the lower pane will display some information about Triangle Research, our products, or software update information (see below). The lower pane can also be used to display help or error messages when writing or compiling your program. Update : A #Define button has been added as of i-TRiLOGI version 6.42 which allows you to define meaningful label names for any variables or expression.
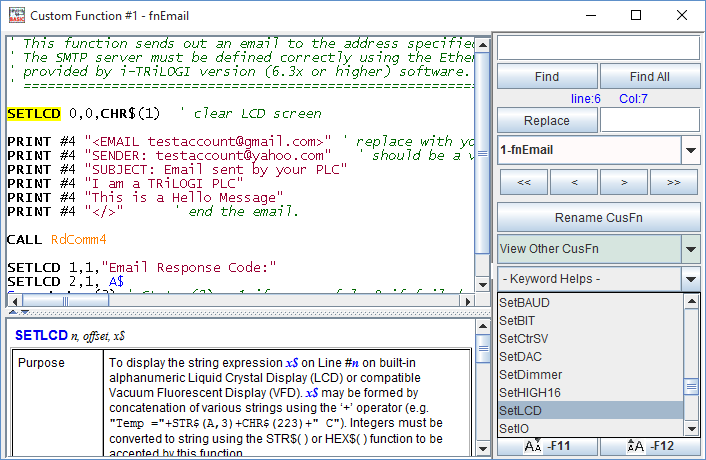
The upper pane is used as a text editor for writing TBASIC code and the lower pane can either display information about Triangle Research (as shown above), or provide immediate help for any TBASIC keyword (as shown below). To use the lower pane for help on TBASIC keywords, simply select the keyword from the “Select Keyword” drop box or highlight the text in the editor. For Example: in the following screenshot, the code "SETLCD" is highlighted and the syntax for "SETLCD" would be displayed as it is in the screenshot.
2.2 New Function Editor Features.
As of i-TRiLOGI Version 6.5x, the following useful features are included in the Help Pane:
a) Select an I/O Label
If the selected text is an I/O label name, the lower pane will display its I/O type and the I/O number as well as the custom function # where the same label name have been used. This can be very useful to find out where a certain variable may be changed in other custom functions.
b) Mouseover an I/O Label
Without clicking or selecting a label, it is possible to mouseover and display a callout window with details about the label.

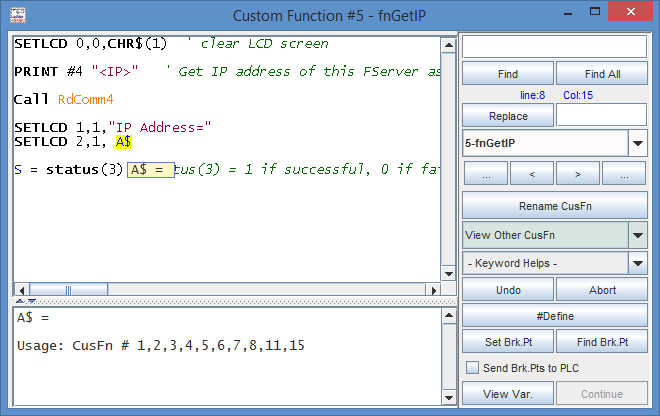
c) Select a Variable
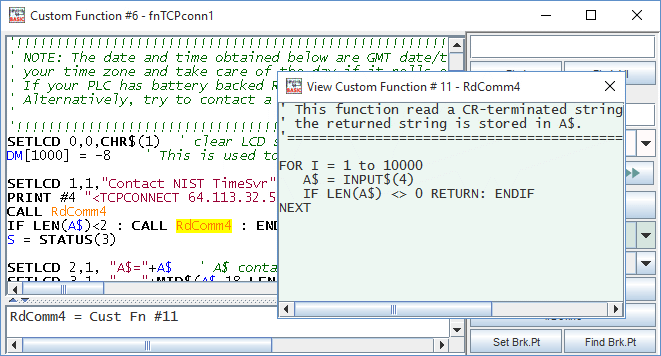
The value is obtained from the simulator if i-TRiLOGI is currently disconnected from any TLServer or F-Server. If i-TRiLOGI is currently connected to a TLServer or F-server and online monitoring is active, then the program will retrieve the current value in real-time from the connected PLC. In the following example, variable DM[1000] has a current value = 8 and it is being used in Custom function #6 and 15.
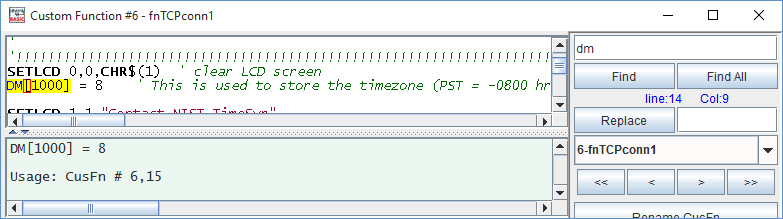
Now in version 6.5x/7.1x and higher it is possible to mouseover a variable to bring up a small callout window with details. Again if the software is in active online monitoring the current value of the variable will be retrieved from the PLC in real time.
d) Select a Custom Function Name
If the selected text is the name of a custom function, a special read-only popup window will appear which displays the content of the selected function. This enables the programmer to view the code of another custom function CALLed by this function without leaving the current function.
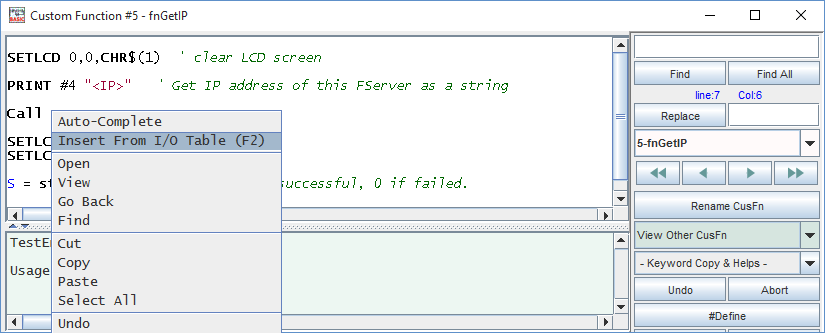
e) Right-Click Custom Function Name
When the cursor is over a custom function name in the editor, it is possible to right-click on the function and perform the tasks described below from the list of options:

Open: You can edit the selected custom function by right-clicking on the selected name and select "Open" from the popup menu. This will switch from the current function to the right-clicked function in the editor (not a pop-up window).
View: You can view the selected custom function by right-clicking on the selected name and select "View" from the popup menu. This will not change the function being edited and the right-clicked function will open in a pop-up window.
Go Back: If you have changed functions since opening the editor, selecting "Go Back" will take you to the previously opened function. You can continue to go back until the first function opened is reached.
If the selected text contains part of the name of a custom function, TBASIC function, label name (I/O Table or define), then it is possible to right click and select Auto-Complete to bring a list of applicable function/label names to select from.

g) Insert from I/O Table (F2)
It is possible to insert elements from the I/O table by right clicking anywhere in the editor or by pressing the F2 shortcut. This could be used to select a custom function to call, an input label to test, an output label to control, etc.
h) Increase/Decrease Font Size (F12 / F11)
Buttons have been added to the editor control panel on the right side that are used to increase or decrease the font size. The same keyboard shortcut keys that control the zoom level in the ladder logic editor will control the font size while the custom function editor window is active (F11 will decrease font size and F12 will increase font size). The zoom level and font size are not synchronized, so they can be controlled independently.
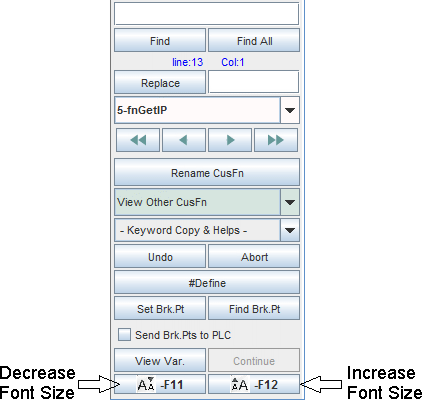
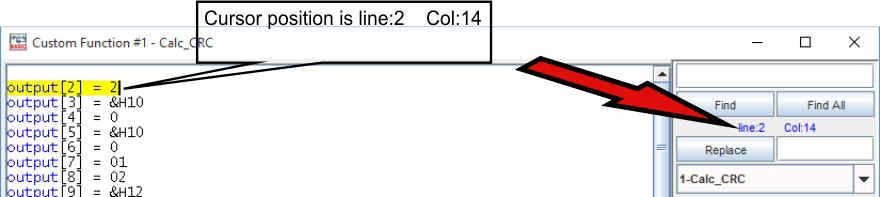
In TRiLOGI 6.49 and higher the row and col of the cursor position within the function editor is display on the right editor panel.
It is now possible to search for a word or phrase in the current custom function (local search) or in all of the custom functions in your program (global search).
Local Search
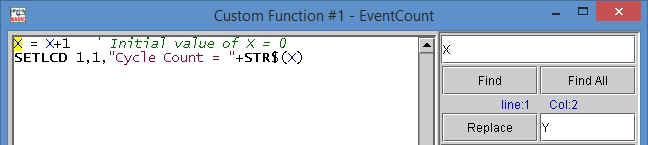
To do a local search, simply type the text in the command line below the "Find" and "Find All" buttons and then click the "Find" button. If the text is found in the current custom function, it will be highlighted in the text editor as shown below. Also, the text "Find only in this CusF" will be displayed below the command line in the search area, indicating a local search. Each time the "Find" button is clicked, the next instance of the search text will be highlighted until the text cant be found anymore. At this point the message in the search area will change to "Text Not Found" and the next time "Find" is clicked, the first result will be highlighted again.

Global Search
To do a global search, simply type the text in the same command line and click the "Find All" button. If the text is found in any custom function within the program, it will be highlighted in the text editor as shown below. Also, the text "Find in all CusF" will be displayed below the command line in the search area, indicating a global search. Each time the "Find All" button is clicked, the next instance of the search text will be highlighted until the text cant be found anymore (in any custom function). At this point the first result will be highlighted again. If no text matches the search text, the message in the search area will change to "Text Not Found".

NOTE: Highlighting of text found in the editor during a user initiated search or
during compilation error tracking now works with JRE (Java Runtime Environment) 1.5 and
1.6
Replace Text
A replace feature is now available in the custom function editor below the Find/Find All text field in TRiLOGI version 6.49 and higher.
To replace text, enter the new text in the replace field and do a local or global search to find the text that is to be replaced.
When the searched text is found and highlighted as in the above figure, click on Replace
and the text in the Replace field will overwrite the highlighted text. The next instance
of the text being searched (if any) will be highlighted automatically.
Continue to click replace until all instances of the searched text have been highlighted
and replaced. Replace will only replace and find text in the same function. Find All is
still needed to search text outside the function that needs to be replaced.
2.5 Navigating Custom Functions
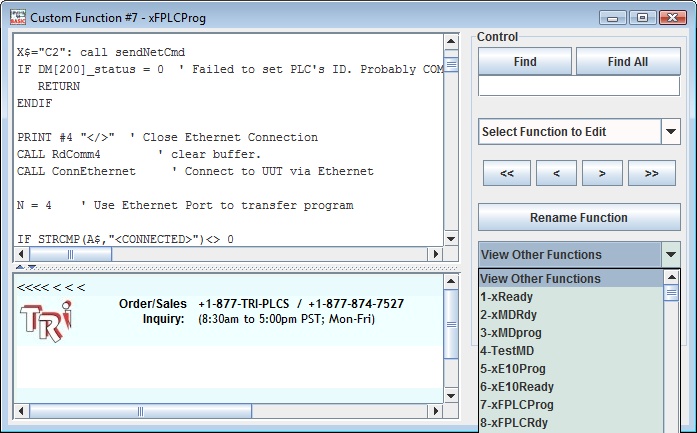
It is now possible navigate to any other function directly by choosing the function name from the “Select Function To Edit” drop box, as shown below.

Alternatively, you can scroll from one custom function to the next one
using the ![]() and
and ![]() keys. However, clicking on the
keys. However, clicking on the ![]() and
and ![]() buttons allows you to scroll to the previous or the
next non-empty CusFn. All empty functions will be skipped. This is useful if you need to
browse through all the custom functions to locate something.
buttons allows you to scroll to the previous or the
next non-empty CusFn. All empty functions will be skipped. This is useful if you need to
browse through all the custom functions to locate something.
2.6 View Other Custom Functions
The "View Other Functions" choice box allows you to view another custom function via a read-only popup window without leaving the currently edited custom function. This is very convenient when you need to view the content of another custom function while editing one custom function.
Click this button to undo any changes you just made to the custom function. You may also use the <Ctrl-z> shortcut key to achieve the same.
The “Undo” button (shown below) can be used to undo the last change to the text in the currently opened Custom Function.
The “Abort” button can be used to abort any changes made to the currently opened Custom Function since it was opened. The custom function editor will be closed when you abort an edit.
Note: If you navigate away from the currently opened custom function,
or if you exit a custom function by using the <ESC> key or by clicking the ![]() button in the top-right corner of the editor, then the content of the custom function
currently in the editor will be updated into the internal memory and you will not be able
to undo or abort changes. Hence you can only abort changes to the currently opened custom
function before you exit the editor or navigate away to another Custom Function.
button in the top-right corner of the editor, then the content of the custom function
currently in the editor will be updated into the internal memory and you will not be able
to undo or abort changes. Hence you can only abort changes to the currently opened custom
function before you exit the editor or navigate away to another Custom Function.
In previous versions of i-TRiLOGI it was not possible to define variable names for the A-Z, DM[], A$-Z$, etc variables. However, in i-TRiLOGI versions 6.42 and up, a define button has been added to the custom function editor that allows users to create a table of variable and expression definitions for all integer/string variables available in TRiLOGI as well as constant values. The next section will describe in details how to use the #Define Table.
This new debugging aid feature is introduced since I-TRiLOGI version 6.45. For more information please refer to Section 7. Debugging & Breakpoints
This new debugging aid feature is introduced since I-TRiLOGI version 6.49. For more information please refer to Section 7. Debugging & Breakpoints
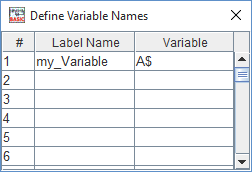
When the above #Define button is pressed a table of definitions will open as a new window, as shown by the picture on the left below. Only the Label Name and Variable columns can be edited such that the name you would like to use should go in the Label Name column and the name of the variable (eg. DM[1], A, A$, etc.) should go in the Variable column. (Click here for more examples of using the #Define table)
It is then possible to right-click on any of the cells to bring up the list of options shown by the picture on the right below.
|
|
If you select the "Find" menu, you will see the following window popup and you will be able to type text in the field that will be searched for within the Define table.
3.2 Insert Row
A new blank row will be inserted above the row where the cell is highlighted when the mouse was right clicked. The highlighted row and all other rows below will be shifted down by 1 row and their row number will increase by 1.
3.3 Delete Row
The row that was highlighted when the mouse was right clicked will be deleted. All other rows below the highlighted row will be shifted up by 1 row and their row number will decrease by 1.
3.4 Copy Row
The row that was highlighted when the mouse was right clicked will be copied.
3.5 Paste Row
The row that was previously copied will be pasted to the row highlighted when the mouse was right clicked.
You will first be asked if you want to clear the content of the #Define Table and you will want to say 'Yes' to proceed with the import (say 'No' and do an export first if you want to save the current table).
 An example define table exported to an Excel file (automatically exported in "Tab Delimited" format) is shown above. Note: row #1, which must be included exactly as shown above in order for the file to properly be imported into the define table. |
 |
You will then need to browse your PC for the .txt (Tab delimited text file) that you have previously exported or created and are now importing. Once you select it, the define table will be populated with all the definitions.
Note: If you are have manually created a "#Define" table using Excel spreadsheet program, you will need to use the correct format in your spreadsheet (shown above) and ensure that the file is saved in the "Tab Delimited format" (not the standard spreadsheet format) with a ".txt" file extension.
You can export all the items in the #Define table of a currently opened .PC6 file to the PC harddisk so that the these definitions can be imported into another .PC6 program. When you select "Export #Define Table" you will just need to name and save the file with ".txt" extension to your desired location. The data are stored in TAB-delimited format, which can be opened directly by a Microsoft Excel program for viewing or editing.
3.8 Using #defineLocal keyword within a Custom Function
Starting from i-TRiLOGI version 6.47, besides using the #Define table you can also define label names that only has local scope by using the #defineLocal labelname = expression.
E.g. #defineLocal RoomTemperature = DM[100]
You can then freely use the label name "RoomTemperature" within this custom function in place of DM[100] so that the program is more readable.
The #defineLocal keyword is useful if you only want the labels to be valid in the current function. It could make it easier to create a library function that you can re-use in other applications without exporting and importing the #Define table. Note that the compiler will first process any label names defined using the #defineLocal before it process the #Define table.
However, unlike the #Define table the program does not conduct a check on whether you have duplicate #defineLocal on the same label, or whether a label so defined is a reserved keyword. So the programmer must exercise care when using #defineLocal to avoid ending up with hard-to-debug compilation errors.
It is important to understand when and how a TBASIC-based Custom Function is executed with respect to the rest of the program. There are basically two ways in which a CusFn will be executed:
4.1 Triggered by Ladder Logic Special function coil [CusFn]
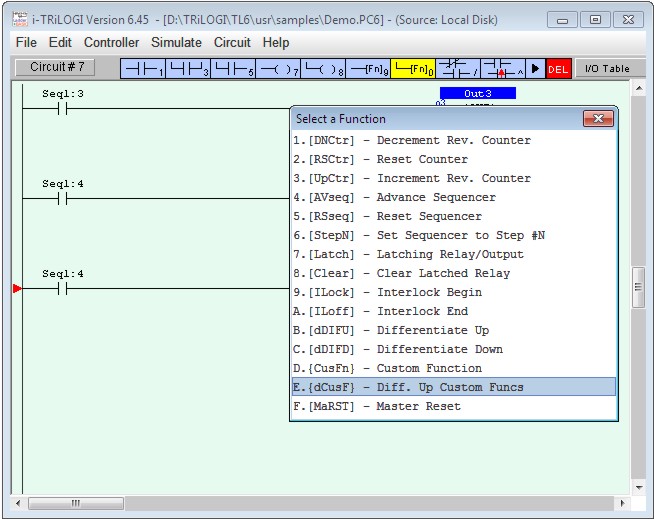
A custom function may work the same way as any other special functions in the i-TRiLOGI ladder diagram programming environment. When you are in ladder circuit editing mode, press <Ins> key to open the "Ins Element" menu.
Select the item
or
to create a special function output. A pop-up "Select a Function" menu will appear.
Select either item:
" D : [CusFn] - Custom created Function" or
" E : [dCusF] - Diff. Up Custom Functn"to create a CusFn. You will be required to enter the selected custom function number from 1 to 256. Note that CusFn created using
" E :Diff. Up Custom Functn[dCusF]"
is a "Differentiated Up" instruction. This means that the function will be executed only once every time when its execution condition goes from OFF to ON. Nothing will happen when its execution condition goes from ON to OFF.
On the other hand, using "D: Custom created Function [CusFn]" will mean that the CusFn will be executed every scan as long as its execution condition is ON. This is often not desirable and the coil created using this menu item will be highlighted in RED color to serve as an alarm to programmer. You will probably find that you will use the differentiated version [dCusF] far more frequently.
NOTE: It is now possible to right-click on a highlighted custom function and toggle between a [CusFn] and [dCusF].
4.2 Periodic Execution of a Custom Function
There are many situations when you need the PLC to periodically monitor an event or perform an operation. For example, to monitor the temperature reading from a probe or check the real time clock for the scheduled time, and to continuously display changing variables on the LCD display. It is not efficient to use the continuous [CusFn] function for such purposes. It is far better to use the built-in clock pulses to trigger a differentiated Custom function [dCusF]. You can choose a suitable period from 0.01s, 0.02s, 0.05s, 0.1s, 0.2s, 0.5s, 1.0s and 1 minute for the application. Other periods can also be constructed with a self-reset timer. The custom function will only be executed once every period controlled by the system clock pulse or the timer, as follow:
For example, you don’t need to update the value of a variable displayed on the LCD screen any faster than the human eye can read them. So using a 0.5s clock pulse may be sufficient and this will not take up too much CPU time for the display. For slow processes such as heating, a 1.0s clock pulse to monitor temperature change is more than sufficient.
IMPORTANT
When the CPU scans the ladder logic to a circuit which contains a CusFn, and the execution condition of the circuit is TRUE, the corresponding CusFn will be immediately executed. This means that the CPU will not execute the remaining ladder circuits until it has completed execution of the current CusFn. Hence if the CusFn modifies a certain I/O or variable, it is possible to affect the running of the remaining ladder program.
Note that the INPUT[n] variables contain data obtained at the beginning of the ladder logic scan and not the actual state of the physical input at the time of the CusFn execution. Thus, it will be futile to wait for the INPUT[n] variable to change inside a CusFn unless you execute the REFRESH statement to refresh the physical I/O before you examine the INPUT[n] variable again.
Likewise, any changes to the OUTPUT[n] variable using the SETBIT or
CLRBIT statement will not be transferred to the physical outputs until the end of the
current ladder logic scan. Hence do not wait for an event to happen immediately after
executing a SETBIT or CLRBIT statement on an OUTPUT[n] because nothing will happen to the
physical output until the current ladder logic scan is completed.
If you want to force the output to change immediately you will need to execute the REFRESH
statement. Consideration must be given to how such an act may affect the other parts of
the ladder program since not the entire ladder program has been executed.
Like all ladder circuits, the relative position of the circuit which triggers the CusFn may affect the way the program works. It is important to consider this fact carefully when writing your ladder program and TBASIC CusFns. Always remember that the CPU executes the ladder logic and CusFn sequentially, even though the equivalent circuits in hard-wired relay may seem to suggest that the different rungs of ladder circuits were to work simultaneously.
In line with the typical Ladder Logic programming rules, a CusFn may
appear only once within the ladder diagram, regardless of whether it appears in the normal
or differentiated form. A compilation error will occur if a CusFn appears in more than one
circuit.
However, a CusFn may be "CALLed" as a subroutine by any other CusFn and there is
no restriction placed on the number of repeated CALL of a CusFn by more than one CusFn. A
CusFn may also modify the logic states of an I/O element or the value of internal timers
and counters using its powerful TBASIC commands (such as SetBit, ClrBit). The compiler
however will not alarm the user that a CusFn may inadvertently alter the logic state of an
I/O already controlled by some other ladder circuit.
This power and flexibility offered by the TBASIC-based custom functions must therefore be handled with greater care by the programmer. It is important to prevent conflicting output conditions due to an I/O being controlled or modified at more than one place within a logic scan. The net result is that the logic state of the I/O appears to be in different states at different parts of the ladder circuit. This could lead to bizarre outcomes that may be difficult to trace and debug.
A CusFn may also serve as an "Interrupt Service Routine" which is executed asynchronously from the normal ladder logic execution. An interrupt-driven CusFn is run when the condition which causes the interrupt occurs. The response time to execution is very short compared to the scan time of the ladder program. There are several interrupt sources which can trigger a CusFn:
Special Interrupt inputs
An M-series/F-Series PLC contains some special "Interrupt" inputs which, when enabled by the INTRDEF statement, will trigger a particular CusFn defined in the INTRDEF statement when the logic level at the interrupt pin changes state (either from OFF to ON or from ON to OFF).
High Speed Counters (HSC) Reach Target Count
An M-series/F-Series PLC contains some "High Speed Counter" inputs which, when enabled by the HSCDEF statement, will trigger a particular CusFn defined in the HSCDEF statement when the counter reaches a preset target count value. This enables the CPU to carry out immediate action such as stopping a motor or performing some computation.
5. Simulation & Examination of TBASIC Variables
i-TRiLOGI fully supports simulation of all TBASIC commands. After you have completed coding a CusFn, test the effect of the function by connecting it to an unused input. Run the simulator by pressing <F9> or <Ctrl-F9> key. Execute the CusFn by turning ON its control input. If your CusFn executes a command that affects the logic state of any I/O, the effect can be viewed on the simulator screen immediately. However, if the computation affects only the variables, than you may need to examine the internal variables.
An I/O or internal relay bit that has been turned ON is indicated by a RED color rectangular lamp that simulate a LED being turned ON. You can pause the logic simulator at any time by pressing the <P> key or clicking on the [Pause] button. Likewise the simulator engine can be reset by clicking on the [Reset] button.
Simulation of ADC Inputs
Along the top edge of the Programmable Logic Simulator screen, you will find 8 text fields adjacent to the label "ADC1-8". The programmer can enter the expected ADC values for ADC#1 to #8 in these text fields. In effect, these simulate the potential signal strength at their respective ADC input pins. These values will be captured by the TBASIC program when an ADC(n) command is executed in a custom function for ADC #n.
Note: values entered at the ADC input text field will only be updated when the user press the <Enter> key or the <TAB> key to ensure that only finalized entries are used by the TBASIC program. (otherwise, imagine if you try to enter the value 123 at ADC #1, the program would first be receiving "1", then "12" and then "123" which was not the intention).
The values of the internal variables as a result of the simulation run can be viewed by pressing the <V> (which stand for "View") key or by clicking on the [View] button while in the simulation screen. A pop-up window will appear with the values of all the variables as well as special peripheral devices supported by TBASIC. The variables are organized into 4 screens. You can move from screen to screen using the left/right cursor keys or by clicking on the navigation buttons:
a) Integer variables Screen
The first screen comprises all 26 32-bit integer variables A-Z, the system DATE and TIME, ADC, DAC, PWM and the resulting values of setLCD commands. The initial DATE and TIME figures shown during simulation are taken from the PC's internal real-time clock values. However, subsequent values can be affected by the values assigned to the variable DATE[n] and TIME[n].
The present values of the first 3 high speed counters: HSC1 to HSC3 are also shown on this page. Note that ADC data for any particular A/D channel #n will only be shown if an ADC(n) function has been executed. Otherwise the ADC value shown on screen will not reflect the true current value of the ADC port.
b) Data Memory Screen
The second screen displays, in 25 pages, the values of the 16-bit DM variables from DM[1] to DM[4000]. Each page displays 16 rows x 10 columns = 160 DM variables. You can scroll up and down the pages by clicking on the [PgUp] or [PgDn] buttons or using the corresponding keys on the keyboard.
Starting from version 6.45 you can use two consecutive 16-bit DM variables as a single 32-bit DM32 variable in the following manner: DM[1] & DM[2] = DM32[1]; DM[3] & DM[4] = DM32[2].... DM[2n-1] & DM[2n] = DM32[n]. A new button "View DM32[n]" is added and when clicked, toggles the view of the DM variables between DM and DM32, as shown below. The range of DM[1] to DM[4000] are mapped to DM32[1] to DM32[2000].
Note: Although this version of TRiLOGI allows you to view any super PLC's DM[] as DM32[] during online monitoring, only new Super PLCs with firmware version r78 or later is able to actually use DM32[n] in its program. i-TRiLOGI will check the PLC firmware version number during program transfer and will not transfer TBASIC program that contains DM32[] variables to those PLC with < r78 firmware.
c) String Variable Screen
The third screen displays the value of the 26 string variables A$ to Z$ in 4 pages, depending on the length of each string. If the execution condition is ON and the CusFn is not of the differentiated type, then the CusFn will be continuously executed. The result of the variable will be continuously updated on the viewing window.
d) System Variable Screen
System variables such as INPUT[n] , RELAY[n] and emINT[n] are visible in this screen. You may wish to click on the [Hex] button to view the values in hexadecimal notation as they are more commonly used by programmers to identify the bit patterns in these variables.
5.3 Changing the Contents of Variables
While the "View Special Variables" window is open, you may change the contents of the following variables by clicking on the [Edit] button:
A-Z, A$ to Z$, DM[n], DM32[n], DATE[n], TIME[n], INPUT[n], OUTPUT[n], RELAY[n], TIMERBIT[n], CTRBIT[n], TIMERPV[n], CTRPV[n] and HSCPV[n], emINT[n], emLINT[n].
A text entry window will pop up and you will have to enter the values in the form of assignment statements, such as:
e.g. A = 5000;
DM[99]=5678;
DM32[100]=&H12789ABC
OUTPUT[2]=&H01AB
B$ = "Welcome to TBASIC"The variable will take up the new value as soon as it is entered, and if the execution condition for any CusFn is ON, the simulator will process the newly entered data immediately and produce the new outcomes. This gives you greater flexibility in controlling the simulation process.
5.4 Decimal and Hexadecimal Representation
All the numeric data shown in the "Special Variables" window are by default displayed in decimal notation. You can display the number in hexadecimal format by clicking on the [Hex] button or by pressing the <H> key. Press the <D> key if you wish to switch back to the decimal format. This feature is very useful for programmers who are familiar with hexadecimal representation of a binary number. The [Hex] button will become the [Dec] button when you enter the Hex display mode.
If you execute the "On-Line Monitoring/Control" command from the "Controller" pull-down menu, i-TRiLOGI will continuously query the PLC for the values of all their internal variables. These variables’ values will be updated in real time in the "View Special Variables" window as described in Section 5.2. You may also alter the value of any variables in the PLC using the "Edit Variable" window (by clicking on the "Edit" button at the "View xxx Variables" window.
This ability of i-TRiLOGI to provide instant and full visibility of all the PLC’s internal variables greatly facilitates the programmers’ debugging process. The ease of programming offered by the i-TRiLOGI programming environment is really what really sets the M-series/F-Series PLCs apart from many other PLCs.
6.1 PAUSE and RESET of Target PLC
During On-Line Monitoring, if the "View Special Variables" window is opened, you can still reset the PLC’s internal data by pressing the <Ctrl-R> key. The PLC can also be halted by pressing the <P> key. A halted PLC can subsequently be released from the halted mode by pressing the <P> key again. You can also change any internal variable data using the "Edit" button on the View Variable screen.
6.2 Using LCD Display for Debugging
You should take advantage of the built-in LCD display port of the PLC to display internal data at the location where you want to track their values, especially if the value changes rapidly which may not be constantly captured by on-line monitoring screen.
7. Debugging With PAUSE & Breakpoints
7.1 Using the TBASIC PAUSE Statement
When debugging your program it is often easier to identify program bugs by pausing the PLC at a certain execution point so that you can examine the data in the variables to understand why the program does not behave the way you expect it to. TBASIC offers the "PAUSE" statement which is always available in all versions of i-TRiLOGI software and supported on all firmware versions of the Super PLCs.
When the program reaches a PAUSE statement it will enter a PAUSE Mode and you can then examine the variable in the PLC. You can add as many PAUSE statement as you need in different part of the program to halt the program execution. However, since the software does not show you exactly where the program is halted except to tell you that a PAUSE statement is known to have been executed in a particular function number, and if you have more than 1 PAUSE statement in a particular custom function then you will need to put some markers so that you know where the program has stopped. The marker could be displaying of some text on the LCD (e.g. "Pause @21") that a certain PAUSE point has been reached or you can assign a certain value to a reserved variable and the value corresponds to the location of your PAUSE statement. This unfortunately means that you need to modify your program in order to break the PLC program at a certain location.
Although it may be only a small effort to add and delete PAUSE statements in the TBASIC program and then re-run the test immediately during simulation, if you don't use the simulator but instead debug your program directly on the PLC, then you must re-transfer the program to the PLC every time you add or delete a PAUSE statement. This can be time consuming if your program is large or you have a very long custom function. So the new BREAKPOINT features described in the next section can be good a time saver.
Starting from i-TRiLOGI version 6.45 a new "Breakpoint" feature has been added to the program so that debugging can be more easily performed without the need to modify and transfer the program to the PLC. The Breakpoint feature is supported on all Super PLCs with firmware version r78 and above. The break point feature is always available to the simulator in this software version but the program does not let you send the program break points to a PLC with firmware older than r78.
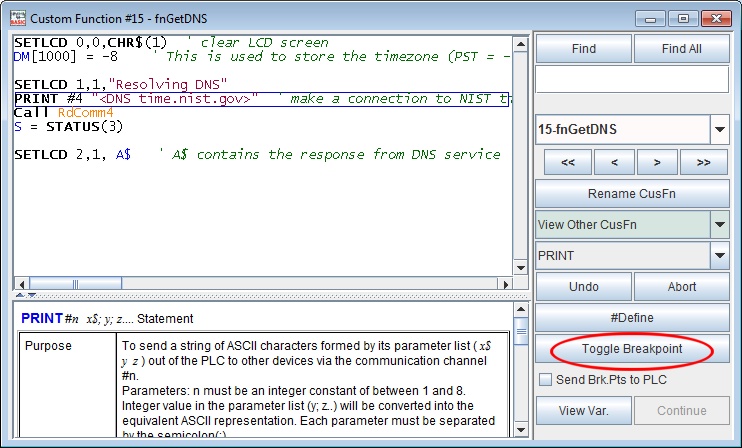
To set a break point in any part of the TBASIC program, open up the custom function and place the cursor on the line where you want the program to pause when it reach the line. Then click on the "Toggle Breakpoint" button to set the break point. A breakpoint that is set will be shown up as a blue rectangular box around the line, as shown below:
If you click on the "Toggle Breakpoint" button again the blue box will disappear, which means the breakpoint has been cleared.
In TRiLOGI 6.49 and higher it is possible to find breakpoints that have been set by clicking on the
button. This will iterate through all of the break points that have been set in the program.
Note:
You can define up to a maximum of 8 breakpoints in a program.
Comment/Remark lines and blank lines are not compiled and breakpoint should not be set on any of these lines.
The breakpoints that you've defined are saved along with the program. Each breakpoint can be cleared individually by placing the cursor on the breakpoint line and the click the "Toggle Breakpoint" button. If you wish to clear all breakpoints in the program you can click on the "Edit" pull down menu and select "Clear All Breakpoints".
7.3 Debugging Using Breakpoint on Simulator
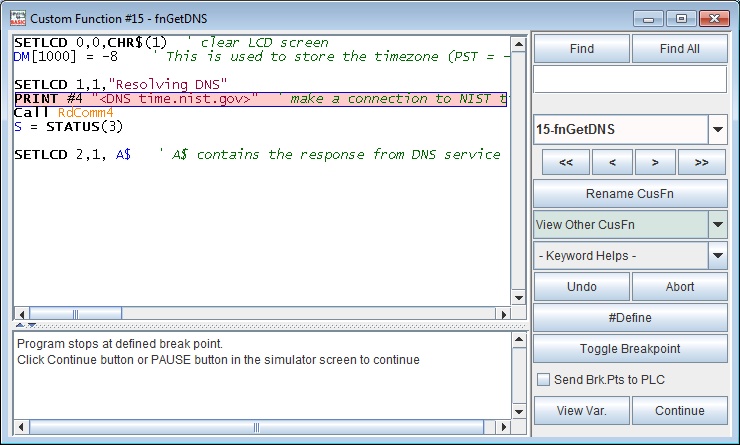
With a break point set in the custom function and if you run the program using the simulator, when the simulator runs to the line where a breakpoint is set the program will pause and the custom function where the breakpoint is defined will be opened with the breakpoint line highlighted as shown in the following picture:
At this point you can examine the variable data by clicking on the "View Var." button, which will open up the "View Variable" screen. You can release the program from its PAUSE state by either clicking on the "Continue" button or by clicking on the "Pause" button on the on-line monitoring screen. The program will continue execution until it hits the next breakpoint. Note that when the program is halted at a breakpoint you can define more breakpoints so as to track the program execution. You can remove old breakpoint at any time if you run out of the maximum 8 breakpoints limit.
7.4 Debugging Using Breakpoints on PLC
Notice the
checkbox below the "Toggle Breakpoint" button? If you wish to halt the actual PLC (not the simulator) when the program runs to the breakpoint, you can send all your defined breakpoints to the PLC by clicking on this checkbox. i-TRiLOGI will connect to the PLC and check if the program in the PLC is the same as the currently open program by verifying the checksums. If the program is current then it will transfer all the defined break point to the PLC. With the checkbox shown as "checked" any subsequent addition or deletion of breakpoints will be immediately transferred to the PLC
When the PLC program reaches the defined breakpoint it will stop execution and the PAUSE LED on the PLC will light up. If you then go online monitoring the program will open up the custom function and highlight the breakpoint line where the breakpoint was encountered.
Note that the breakpoint sent to the PLC is volatile. If you reboot or power-on reset the PLC all the breakpoints will be disabled. This ensure that production PLC will not halt at any breakpoint that you forget to clear.
To manually clear all the breakpoints, you can un-check the
If a PLC stops at a breakpoint that is not defined in your current file then the i-TRiLOGI program will give you an alert and will not be able to display the line where the program break.
Since the CusFn text editor does not restrict the type of text that may be entered into its editor, the i-TRiLOGI compiler will have to check the syntax of the user’s TBASIC program to look out for mis-spelling, missing parameters, invalid commands, etc. Such errors which can be tracked down during compilation process are know as "Syntax Errors".
8.1 Syntax Error
i-TRiLOGI employs a sophisticated yet extremely user-friendly syntax error tracking system: When a syntax error is encountered, the compilation will be aborted immediately and the CusFn which contains the error is automatically opened in the text editor. The location of the offending word is also highlighted and a pop-up message window reports to you the cause of the error. You can then immediately fix the error and re-compile until all the errors have been corrected.
8.2 Run-Time Errors
Error Message
Cause / Action
Undefined symbol found
Only TBASIC commands and legal variable names are allowed. See Chapter 3.
Compiler internal error
Serious trouble, please email to the manufacturer support@tri-plc.com to inform us.
" ) " found without matching " ( "
-
Integer expected
Expect to see either an integer variable or integer constant.
Value is out-of-range
Check the language reference for allowable range of values for the command.
Duplicate line label number
Label for goto must be unique within the same CusFn.
Undefined GOTO destination:
Put a matching label at the place where the GOTO statement is supposed to go.
Invalid GOTO label
@# must be in the range 0-255
Type mismatch (numeric and string types may not mix)
In an expression, strings and integers may not be mixed unless converted using the conversion function. e.g. STR$, VAL, etc.
String is too long
A string is limited to 70 characters
Too many line labels
There should not be more than 20 GOTO labels within the same CusFn.
Unknown Keyword
Most likely wrong spelling for TBASIC statement or function.
WHILE without ENDWHILE
Every WHILE statement must be ended with a matching ENDWHILE statement. Nested WHILE loop must have proper matching ENDWHILE for each WHILE.
IF without ENDIF
Every IF statement must be ended with a matching ENDIF statement to define the boundaries for the block controlled by the IF statement. For multiple IF THEN statement, each IF must be matched by a corresponding ENDIF.
FOR without NEXT
Every FOR statement must be ended with a matching NEXT statement to define the boundaries for the block controlled by the FOR statement. For nested FOR loops, each FOR must be matched by a corresponding NEXT.
Expect keyword "TO"
Required by FOR statement.
Must be an integer
String variable or constant not allowed.
Must be an integer variable only
Integer constant not allowed.
Must be an integer constant only
Integer variable not allowed.
Must be a string
Integer constant or variable not allowed.
Must be a string variable only
String constant not allowed.
Must be a string constant only
String variable not allowed.
Incomplete Expression
Expression not ended properly.
String constant missing closing "
String constants must be enclosed between a pair of opening and closing quotation character (")
Must be Integer A to Z only
index for FOR..NEXT loop must be A-Z.
Certain errors only become apparent during the execution of the program, e.g. A = B/C . This expression is perfectly OK except when C = 0, then you would have attempted to divide a number by zero, which does not yield any meaningful result. In this case a "run-time error" is said to have occurred. Since run-time errors cannot be identified during compilation, i-TRiLOGI also checks the validity of a command during simulation run and if a run-time error is encountered, a pop-up message window will report to the programmer the cause and the CusFn where the run-time error took place. This helps the programmer locate the cause of the run-time errors to enable debugging. The possible run-time errors are listed in the following table and they are generally self-explanatory.
Run-Time Error Message
Divide by zero Call stack overflow! Circular CALL suspected! FOR-NEXT loop with STEP = 0! SET_BIT position out-of-range! CLR_BIT position out-of-range! TEST_BIT position out-of-range! STEPSPEED channel out-of-range! Illegal Pulse Rate for STEPMOVE! Illegal acceleration for STEPMOVE! STEPMOVE channel out-of-range! STEPSTOP channel out-of-range! ADC channel out-of-range DAC channel out-of-range LED Digit # within (1-12) Only! PWM Channel out-of-range! LCD Line # must be (1-4) Only! PM channel out-of-range! System Variable Index Out-of-range! Shifting of (A-Z) Out-of-range! Illegal Opcode - Please Inform Manufacturer! Timer or Counter # Out-of-Range!