All commands in this menu are for communication with the PLCs via the
PLC Ethernet F-Server or via the TLServer. Hence either the PLC's Ethernet port is
connected to the LAN, or a TLServer software must be actively running and connected
to the PLC(s) via the PC's serial port before the commands here can be successfully
executed.
If you are using the TLServer software, then note that TLServer can be
running on the same computer that i-TRiLOGI is running on (using localhost IP 127.0.0.1) ,
or on another computer in the same local area network, or anywhere in the world with an
Internet connection. The experience is identical regardless of where the TLServer (and
hence the PLC) is situated.
If there is no existing connection made to the F-server or the
TLServer, then execution of any command in this menu will always bring up the password
dialog for you to enter the Username/Password as well as the IP Address:port of the
server. If you have enabled the "use password" option in the F-Server or if you
are connecting via TLServer, then you must be positively authenticated before you are able
to log-in to the server. See Log In to TLServer for detailed
explanation of the Username/Password Dialog box. Once you have log-in to the server, see
explanation of each function below:
The only editable field is the ID field. You have to enter the ID
address in hexadecimal notation (00 to FF). This command allows you to select another PLC
that is connected to the same TLServer but with a different ID for on-line monitoring or
program transfer.
Use this command to log-in to the PLC Server or
TLServer only if you have no intention to perform other controller commands. You may find
that you seldom need to use this command since running the On-Line Monitoring or Program
Transfer commands will also let you log-in to the TLServer if you have not yet done so.
However, once you are connected, this command changes into "Disconnect from
Server" and this is the way for you to log out of the currently connected PLC so that
you can use the Username/Password dialog box to log-in to another PLC of a different IP
Address/port number.
See On-Line Monitoring help page for details.
This command is only available if your log-in username is assigned the
access level of a "Programmer". If you log-in as a "User" or
"Visitor", this command is disabled from the Controller's menu. (It will be
enabled again after you disconnect from the server)
You can use this command to transfer your i-TRILOGI ladder+TBASIC
program into the PLC. You will be prompted to confirm your action to prevent accidentally
affecting the target PLC. The ladder program must be compiled successfully before the
program transfer process can take place. The progress of the transfer process will be
clearly shown on the program transfer dialog box.
NOTE: When doing a program transfer, it is possible to abort a transfer
even after the transfer has started. However, the PLC will be left in PAUSE state if a
program transfer has been aborted to prevent execution of an incomplete program.
NOTE: The Program Transfer window is now wider to accommodate file
names with longer strings and/or in other languages.
This new command is added from i-TRiLOGI version 6.41 onwards. It lets you transfer a
file that has been saved previously to the hard disk using the "File -> Write
Compiled Code To Disk" function under the "File"
Menu.
Using this function you can send compiled code to other users to be transferred into
the PLC using a licensed copy of i-TRiLOGI v6.41 and above, but without revealing your
source code. To ensure that the file is not corrupted when you email to others, try to
compress it using a Zip or Rar software.
You can use this command to query the connected PLC for the filename of
the last i-TRiLOGI program transferred to it and it will attempt to match it to a file
stored in the log-in user's directory at TLServer or on the PC's hard disk. If the file is
found, it will be opened. Otherwise it will report that the file is not found. Note that
this command only opens the source file based on file name matching. It does not verify
whether the file has been modified. It is the user's responsibility to ensure that the
file stored in the server is the same one that has been compiled and transferred to the
PLC.
If you have created a new file (i.e. the file name is
"Untitled" ) and then attempt to perform on-line monitoring, this command will
be called automatically to try to open a file that matches the PLC. The command is also
invoked when you select a PLC with a different ID either from the "Controller"
menu or from within the "Full-Screen Monitoring" window.
Note to Unicode users: If you created your file name using Unicode
instead of plain ASCII, the Unicode filename will not be saved into the F-Series /
M-series PLC since the PLCs do not support Unicode in its internal memory. In such case
you cannot use this command to open the matching source file. You would have use the
"File -> Open (Local Drive)" command to manually open the file for
monitoring purpose.
You can find out the PLC's firmware version number, the maximum of input,
outputs, relays, timers and counters supported on this PLC as well as the total amount of
program memory available. The same info will be displayed when you try to transfer a
program to the PLC.
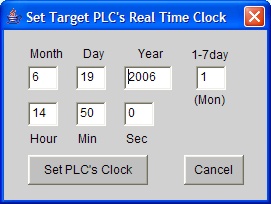
The PLC's real time clock (RTC, which includes both date and time) can
be set quickly using this command. When you execute this command, a dialog box which
contains the year, month, day, hour, min, sec and day of week are displayed for you to
enter the value. The dialog box is initially filled with value taken from the client's
computer's own calendar and clock. You can change any of the field to the desired values
and then click on the "Set PLC's Clock" button:
The dialog box will be closed after the i-TRiLOGI has transferred all
the data to the PLC. You should use on-line monitoring to verify that the data has indeed
been properly written into the PLC.
Note that the "Year" field is restricted to only between 1996
and 2096, "Month" is between 1 and 12, "Day" is between 1 and 31,
"Hour" is between 0 and 23, "Min" and "Sec" are
between 0 and 59. If you enter an illegal value i-TRiLOGI will beep and the cursor will be
put at the offending text field. Correct the mistake and then click on the "Set PLC's
Clock" button again to transfer the values to the PLC.
This new command is added to i-TRiLOGI version 6.47 build 01. It
can force the PLC to reboot as if it has been powered cycle so that it can load new
configuration or clear any system errors. This command however does not work on the
older T100MD+/T100MX+ PLCs.
This new command is added starting from i-TRiLOGI version 6.1. Please click here for more details
This new command is added starting from
i-TRiLOGI version 6.3. Please click here for more details

This new command is added starting from
i-TRiLOGI version 6.43. Please click here for more details